Add a Background
The first thing our game needs is a background image. You can’t have a game set in space without some stars to set the scene!
Games built using Phaser are made up of one or more scenes. You can think of each scene as a stage where will place actors (images) and tell them what to do. In a scene we can places images, text and sound effects. In our project, we have 2 scenes - a title screen and then the main game itself.
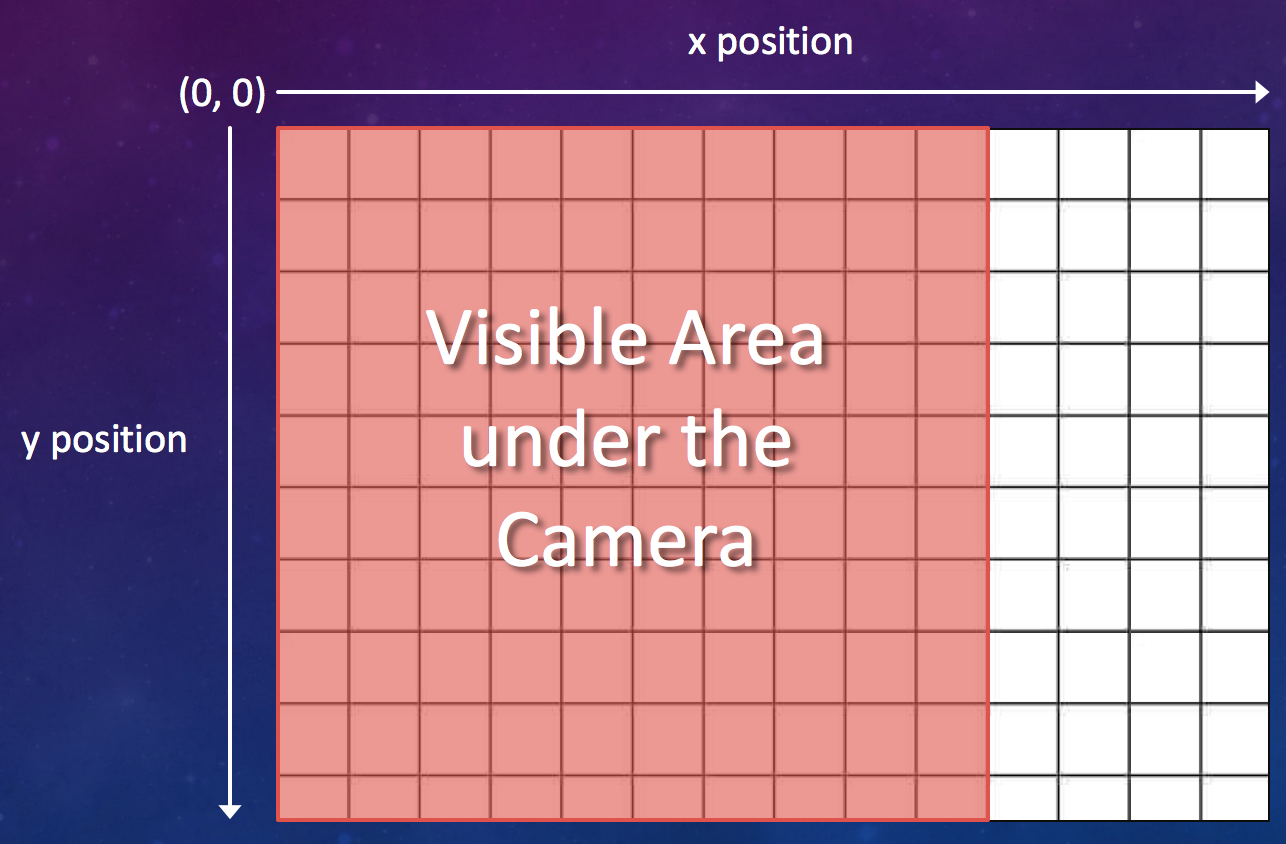
The scene can be thought of as one massive canvas (infinite) with lots of pieces of cardboard on which we can move around. All we need to do is tell phaser where the images we want to draw exist in the world, and Phaser will draw them for us. While the canvas is infinite, we can only see a small part of it at once (the part under the camera, or the part which fits into our game window).
Task Definition
Your first task is to add a background image to your game. We’ve provided a large space image you can use, but you’re also welcome to find any other image you like and use that.
The overall steps for completing this task are as follows;
- If you want to use a different background image, you should find an image online and place it in the assets/images folder.
- Before you can add an image to your scene, you must first load it into memory. In the existing preload function you should use this.load.image(name, path);.
- Now you can add the image to your scene. As you want the image to exist from the start of the game, you should add some code to the create function. You will need to use this.add.image(x, y, name);.
Tip. You will want to make sure you add the background image before you create the player ship, otherwise it will lie on top and hide the other images!
Walkthrough
The following steps will walk you throgh the process of this task.
1. (Optional) Adding a background image to your Project
If you don’t want to use the default space background, you should head online and find a background image for your project. Once you’ve found it, you need to add that image to your project. We should only access files that are packaged into your project, so you should copy the file into your project folder. It’s good to keep all of the images together, so I suggest placing it at the following path;
assets/images/space.jpg
2. Pre-loading your Asset
Before you can start drawing your background on the screen you need to load the image into your game. Players visiting your game via a website URL will first download the HTML and CSS files that wrap around your game. Once they have downloaded, their web-browser will see that you have links to JavaScript files in the header and load those in too. Soon after, your game will start, but at this point the user’s browser has no idea what images and audio files make up your game.
Because you don’t want the game to stall and wait every time a new image is required - it’s typical in all games to “preload” assets before you need to use them. This is often done during a “loading screen” or during start-up. While we won’t have a loading screen in our simple game, we will still load everything at start up so that the game itself runs smoothly (even if that means it takes a few seconds to start).
If you need a reminder about the preload(), create() and update() methods do, see the Project Intro page. At this stage though, we will be using preload to load the space image into the game.
preload()
{
	this.load.image('space-bg', 'assets/images/space.jpg');
}
As you can probably guess from the code, the this.load.image(name, path) function loads an image for the game to use later. This function takes two parameters name and path.
- name: Every asset you load into your game is given a friendly name which is different to the path from where you loaded the file. You will use this name later when you tell the game which image you want to draw instead of the file path. This is really convenient if you decide you want to swap an image later on - you simply need to change the path for the image but keep the same name, then you don’t need to change all of the bits of code elsewhere where you create a sprite using this image.
- path: This is the path of the files where it exists in your project. It should match up with the file that you can find in the project browser in Brackets.
With your updated preload function in place, you should be loading the image into your game so now it’s time to put it into the world.
3. Space, the Final Frontier…
Last but not least, we need to actually add the background image to the game world. One way to think of the game world in Phaser (or many 2D game engines) is to consider the world as a big, board game table. To start with, there is nothing on the table at all - it’s just black empty space. When you create a scene in your game, you can add things to that table - stacked in the order you put them on the table.
For instance, for your space game - you might want to place a big picture of space at the bottom later. On top of that, you will add smaller tokens / images, such as space ships and asteroids. Once you have added these objects to the table, you can move them around by altering their position (and even switch around the order they are stacked on top of each other).
In your scene’s create() function you will typically add everything to your world that you want to appear when the game starts. You will continually add and remove tokens from the world as the game progresses - creating new asteroids and removing destroyed enemies, but the create function is a great place to add things that you know should always exist, such as the space background.
In your create background, you can add an image using the following code;
create()
{
	this.add.image(0, 0, 'space-bg');
}
The this.add.image([x], [y], [imageName]); function adds a single image to the world (typically known as a ‘sprite’). When we call the function above, we add the space background at position “0,0” on the table (the top left of the world). We also need to provide the name of the image that we loaded earlier.
Extensions
Here are some experiments for you to try out when you’ve finished this task;
- Try passing different x,y co-ordinates to the this.add.image(…) function call and see what happens.
- Try printing out the size of the game canvas to the console using this.game.config.width and this.game.config.height.
- Try some of the following lines of code in your create or update function to play with the camera. this.cameras.main.setZoom(4); or this.cameras.main.centerOn(x, y);.
Solution
If you’re running into any problems getting your space image on the screen, you can grab the solution from the spoiler below.
Tip: Check your Google Chrome JavaScript Console for errors before resorting to checking the solution!
Add the following lines of code to main-game.js
preload()
{
	// Existing Code...
	this.load.image('space-bg', 'assets/images/space.jpg');
}

create()
{
	this.add.image(0, 0, 'space-bg');
	// Existing Code...
}