Project Intro
Template Project Structure
In the template project we have provided to get started, you will find a handful of files. This is what they do;
| assets/audio/ | Contains audio files you can use later on to add sound FX to your game. | |
| assets/images/ | Images and graphics you can use in your game. | |
| assets/music/ | Background music you can use to spruce up your game. | |
| index.html | While you will write our game in JavaScript, you need to wrap it up in a web page to be able to view it. The index.html file is the web page that will host your game. This file also links together all of the JavaScript text files that make up your game. | |
| js/main-game.js | The main game JavaScript file. This is where you will spend most of your time, tweaking and adding to your game. | |
| js/title-screen.js | We have made a simple Title Screen which appears before the game starts. Feel free to add your own images and upgrades here if you want a more fancy title screen. | |
| libs/ | We have built our game using an open-source JavaScript library called "Phaser". Phaser is a 2D JavaScript game engine which provides a platform for building games without having to reinvent the wheel for the sorts of things that nearly every 2D needs to do. |
Phaser Scenes
A Phaser App (and quite often games in other engines, like Unity3D) are made up of a number of scene. Each scene is almost like a self-contained ‘mini-app’ which runs within your game.
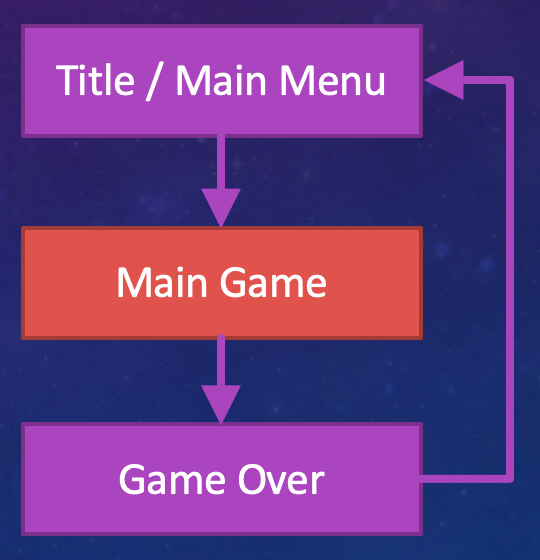
For our game, we will have 3 different scenes;
-
Before starting the game you are presented with a Title Screen, which is the first Scene you will see. The title screen will show off your game and wait for the player to be ready to start.
-
Next up we will wrap all of the main game in a single Main Game Scene. Every time this scene is shown, it is reset to a predefined starting state.
-
When the player finally dies, we transition to the Game Over Screen, which is another Scene in itself. After clicking a button on the game over scene, we go back to the Title Screen and start over.
Lifecycle of a Scene
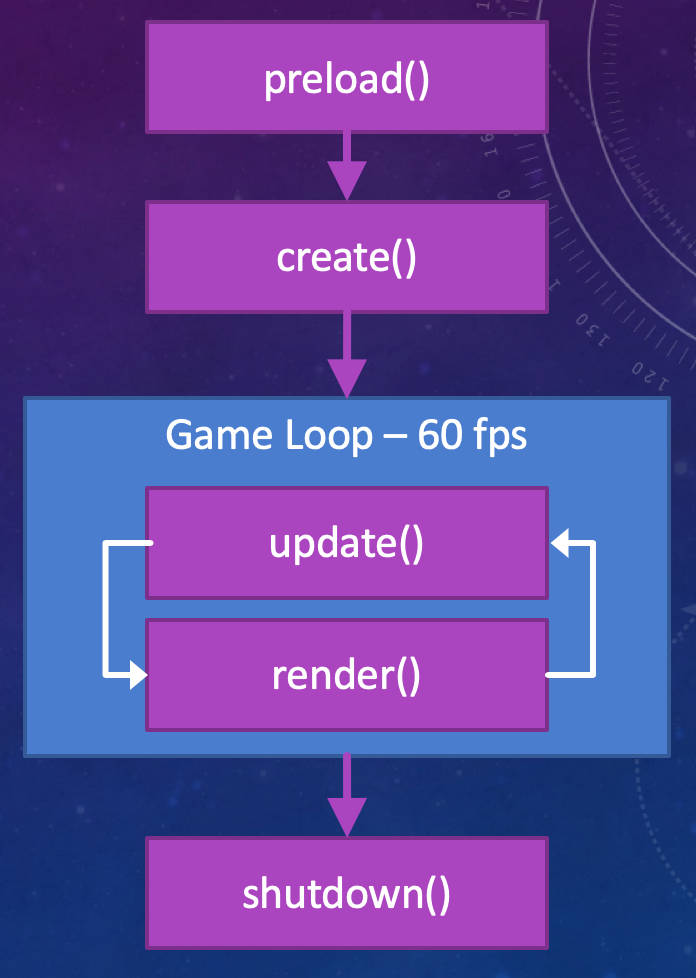
We typically store each separate scene in a separate JavaScript file, and you can see the 3 scenes in the js folder of the template project. All states should have these three functions as a base and this is why Phaser needs them;
preload: Phaser will call ‘preload’ when creating your scene (while your game is starting up). This is where you should load up all of the images and audio you need to use in your game.
create: Phaser will call ‘create’ after calling preload, but still while creating your scene. This is where you can place objects in the scene or setup a user interface before the scene is shown to the player. The create function is called once every time the scene is shown, just before it appears on the screen.
update: Phaser calls ‘update’ every time your screen refreshes - that could be up to 60 times every second! This is basically where nearly all of your game logic will live. Here you will check whether the player is pressing a button on the keyboard and respond by firing bullets or moving the spaceship.
Script File: main-game.js
This is the JavaScript file where we will spend nearly all of our time during this course. It is where you can add code to your game to make things happen.
The following functions exist in the template project of this file;
constructor(): This is called automatically as soon as your game starts up. We only use it for telling Phaser what our scene should be called. We won’t need to do anything else in this function during this course.
preload(): This is called once when Phaser knows you will show this scene soon. It is used to load up all of the images and audio you need for the game.
create(): This is used to setup the scene. You can place your background image and setup things that are needed for the game to run.
update(time, delta): This is called over and over by Phaser - up to 60 times a second. This is where you should check whether the user is pressing a key and check whether things collide etc. i.e. Nearly everything that happens while your game is running happens here.
createPlayerShip(): We created this function to show how you might create the space ship that the player controls. We run it from the create() function.
createAsteroid(): This is another function we made just for our game. It creates an asteroid at the top of the screen. You can call it using this.createAsteroid() from anywhere in the scene to create a new asteroid.